
Moving a pool table is a massive undertaking. We’re not talking about just another piece of heavy furniture; a single piece of slate can weigh well over 100 kilograms. Its sheer weight and the fragility of its precision components make it one of the most difficult items to relocate, demanding skills that go far beyond a standard house move.
Why Moving a Pool Table Is Not a DIY Job
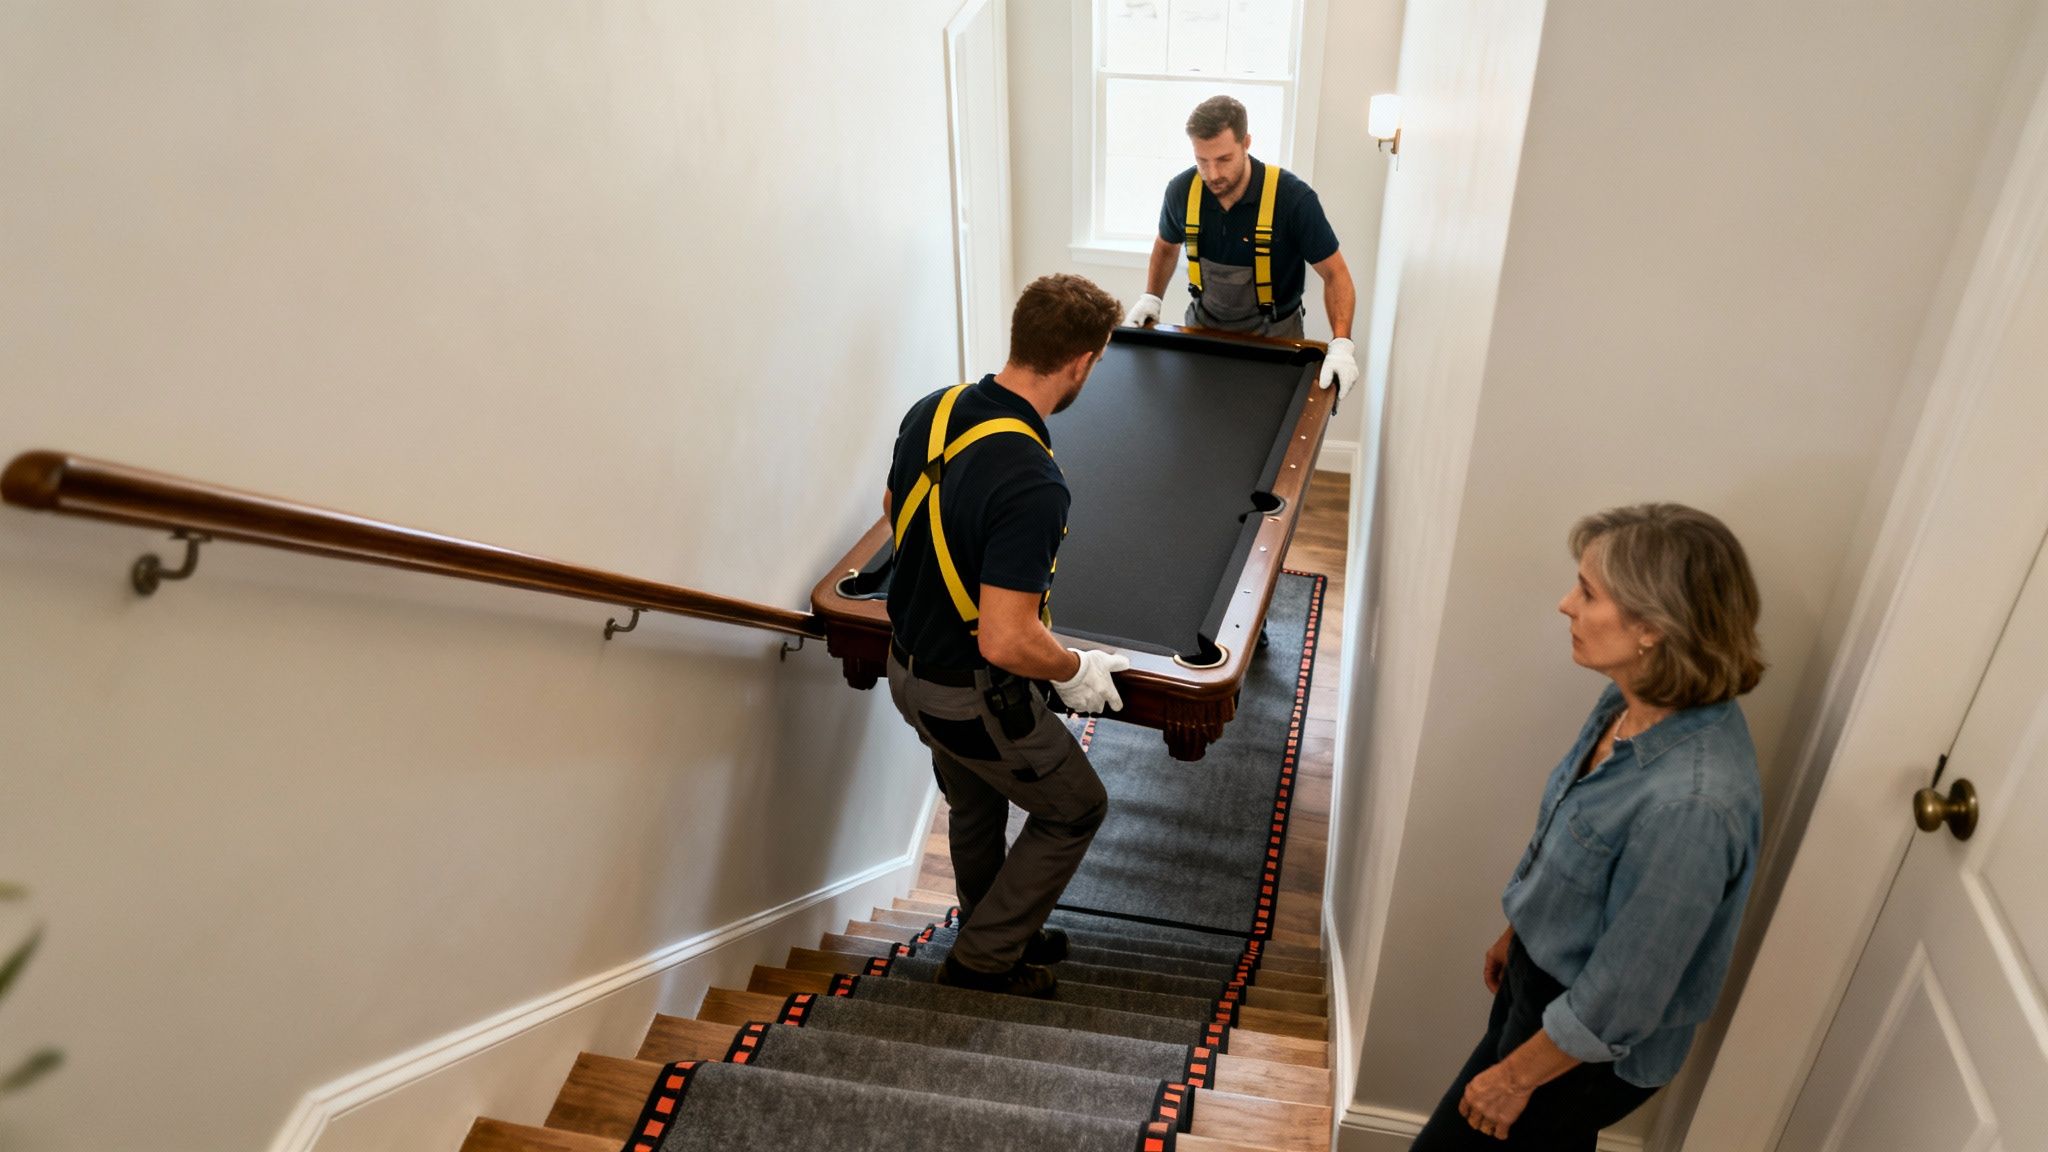
The idea of saving a few dollars by moving a pool table yourself is always tempting, but trust me, the reality is often far more expensive. Unlike a bookshelf or a sofa, a pool table is a finely-calibrated instrument built from incredibly heavy and surprisingly delicate parts. Trying to move it without the right experience and gear opens the door to serious risks—for the table, your home, and yourself.
Think about the common challenges we see here in Perth. Trying to manoeuvre a slab of slate down the tight stairwell of a Subiaco apartment or protecting the beautiful heritage timber floors in an old Fremantle home takes more than just brute strength. It requires a proper strategy.
Each piece of slate has to be lifted perfectly evenly to stop it from cracking under its own immense weight. One wrong move, one slight imbalance, and your table is instantly a write-off.
The True Cost of a DIY Move
The potential for disaster goes way beyond just dropping a heavy slab. If you don’t know the proper disassembly sequence, you can easily end up with stripped bolts, torn felt, and warped wooden rails.
Even seemingly minor damage can throw off the table’s structural integrity, completely ruining how it plays. And these aren’t simple fixes. Repairing a cracked slate or replacing custom-fit felt will almost always cost you significantly more than hiring professional movers in the first place.
Then there’s the physical toll. Lifting that much weight without proper technique is a surefire way to end up with a serious back or joint injury. It’s a job that absolutely requires teamwork, coordination, and the right equipment.
A poorly executed DIY move can easily result in thousands of dollars in damage to the table, your home, or worse—a trip to the emergency room. The initial savings are rarely worth the long-term consequences.
Before you make a final decision, it’s worth taking a hard look at what’s really involved. A simple comparison can highlight the hidden costs and risks that aren’t immediately obvious.
DIY vs Professional Pool Table Move a Reality Check
| Factor | DIY Move | Professional Mover |
|---|---|---|
| Risk of Damage | High risk to table, floors, walls, and doorways. A single cracked slate can ruin the table. | Extremely low. Movers are experienced and fully insured against accidental damage. |
| Hidden Costs | Tool rental, vehicle hire, potential repair bills for table or property damage, medical costs from injury. | All costs are included in the quote. No surprise expenses. |
| Time & Effort | A full weekend job, at minimum. Extremely physically demanding and stressful. | A few hours of work, handled entirely by the professional team. Zero stress for you. |
| Specialised Tools | Requires renting or buying specific dollies, straps, and disassembly tools. | Professionals arrive with all necessary, high-quality equipment. |
| Reassembly | Very difficult. Achieving a perfectly level playing surface is a specialised skill. | Meticulous reassembly and professional levelling are standard parts of the service. |
| Safety | High risk of serious personal injury (back, joints, crushed limbs) due to extreme weight. | Trained professionals use proper lifting techniques and safety gear to eliminate risk. |
As the table shows, the upfront cost of hiring a pro often pales in comparison to the potential financial and physical costs of doing it yourself.
Protecting Your Investment
Hiring professional movers isn’t just about convenience; it’s about protecting a valuable asset. A professional team brings the right gear—like dedicated furniture dollies and heavy-duty lifting straps—and, more importantly, the expertise to navigate tricky spaces without causing a scratch. Understanding the general challenges of shifting large items can provide more insight; you can learn more about how to move heavy furniture to appreciate the complexities.
Ultimately, a professional service ensures your table isn’t just dumped in a new room. It guarantees it will be meticulously reassembled, perfectly levelled, and ready for a game right away. That’s a level of precision a DIY effort can rarely hope to match.
Getting Your Gear and Clearing the Way
Before you lay a hand on the table, let’s talk about prep. A smooth pool table move is 90% preparation and 10% execution. Jumping in without the right tools and a clear plan is a surefire way to damage the table, your house, or even yourself. Think of it like a surgeon laying out their instruments—every piece has a purpose.
Having everything you need within arm’s reach from the get-go saves a world of frustration. There’s nothing worse than having a 200 kg slab of slate half-off the frame, only to realise the right socket is still in the garage.
Your Must-Have Tool Kit
Let’s get your tools sorted. Each one plays a critical role in taking the table apart safely and putting it back together perfectly.
- Socket Wrench Set: This is non-negotiable for getting the rail bolts off from underneath the table.
- Power Drill with Various Bits: You’ll thank yourself for this one. It makes quick work of the dozens of screws holding the frame together.
- Staple Puller or Needle-Nose Pliers: The felt is held on by countless staples. You’ll need one of these to gently pry them up without ripping the cloth.
- Machinist’s Level: Forget a standard carpenter’s level; it’s just not precise enough for this job. A proper machinist’s level is the only way to guarantee a perfectly level playing surface when you reassemble.
- Plenty of Moving Blankets & Bubble Wrap: Don’t be stingy here. Every single piece, from the delicate wooden rails to the heavy slate slabs, needs to be wrapped thoroughly to prevent chips and scratches.
Planning Your Exit Strategy
Once your toolkit is ready, it’s time to survey the battlefield. Professional movers never skip this step because it nips potential disasters in the bud. Grab a tape measure and map out the entire route from the table’s current spot to the moving truck.
Measure every doorway, hallway, and staircase the table parts will travel through. Now, compare those numbers with the dimensions of the biggest components—the slate sections and the main frame. It’s easy to forget that a piece might fit down a straight hallway but won’t make it around a tight corner. This is a classic snag when moving big, bulky items. For a deeper dive into these kinds of spatial puzzles, our guide on how to move heavy furniture has some great pointers.
Pro Tip: Completely clear the path before you lift anything. Move rugs, side tables, pictures on the wall—anything that could get in the way or become a trip hazard. A clear path is a safe path.
Taking Apart a Pool Table: A Step-by-Step Breakdown
Alright, you’ve got your tools laid out and a clear path from the games room to the truck. Now for the main event: taking the table apart. This is where patience really pays off. Think of it less like a demolition job and more like careful surgery. Rushing here is the quickest way to end up with stripped bolts, a torn playing surface, or worse, chipped rails.
First things first, let’s get those pocket liners out. Depending on your table’s model, you’ll find they’re either stapled in or held by a couple of small screws. A staple puller or a screwdriver is your best friend here. Work them out gently, especially if they’re leather, as you don’t want to cause any tears.
Removing the Rails and Felt
Once the pockets are clear, it’s time to tackle the side rails. These are the long, heavy timber pieces that frame the playing surface, and they’re almost always bolted on from underneath. This is a job for your socket wrench. Get on your back, find the bolts, and start loosening them. It’s a smart move to have a mate ready to support the rail as you free it up—they’re heavier than they look.
I can’t stress this enough: label everything. As you take off each rail, put its bolts and washers into a separate ziplock bag and label it clearly. A bit of masking tape on the rail itself (e.g., “Head Rail,” “Side Rail 1”) will save you a world of headaches when you’re putting it all back together.
With the rails gone, you can now get to the felt. This is where you’ll see if it’s stapled or glued to the slate.
- If it’s stapled: Use your staple puller and work your way around the edge, carefully prying each one out. Go slow to avoid ripping the cloth.
- If you plan to reuse the felt: Make sure you roll it up, don’t fold it. Folding creates creases that are nearly impossible to get out and will affect the roll of the ball later on.
The graphic below shows the critical prep work that should be done before you even think about touching a screwdriver.

As the visual shows, getting your measurements right, clearing the path, and protecting your floors aren’t just suggestions—they are foundational steps for a smooth and damage-free move.
Handling the Slate: This is Where It Gets Serious
Now we’re at the most critical—and heaviest—part of the job: lifting the slate. This is the very soul of your table. It’s also incredibly heavy and surprisingly fragile. Most tables these days have a three-piece slate system, and each of those slabs can weigh between 80 and 120 kilograms. This is not a one-person task.
The slate sections are screwed directly into the table’s frame. You might find the screw heads are covered with beeswax or putty, which you’ll need to carefully scrape away. Once you can see them, use your power drill to back them out. Get at least two strong helpers ready for the lift.
Crucial Tip: When you lift, lift straight up. Do not tilt the slate or put uneven pressure on it. This is the single biggest cause of cracked slate, a mistake that is both heartbreaking and extremely expensive to fix.
As each piece of slate comes off, grab a marker and number them on the side (e.g., 1, 2, 3, starting from the head of the table). This is vital because the pieces have been ground to match perfectly, and reassembling them in the right order is the only way to get a seamless, level surface. In fact, misalignment is a factor in over 55% of all post-move playing issues. This is why professional teams are so meticulous, wrapping every component and using special gear for reassembly. If you’re curious, you can learn more about professional moving costs and methods to see the difference expertise makes.
Protecting Each Component for Safe Transport
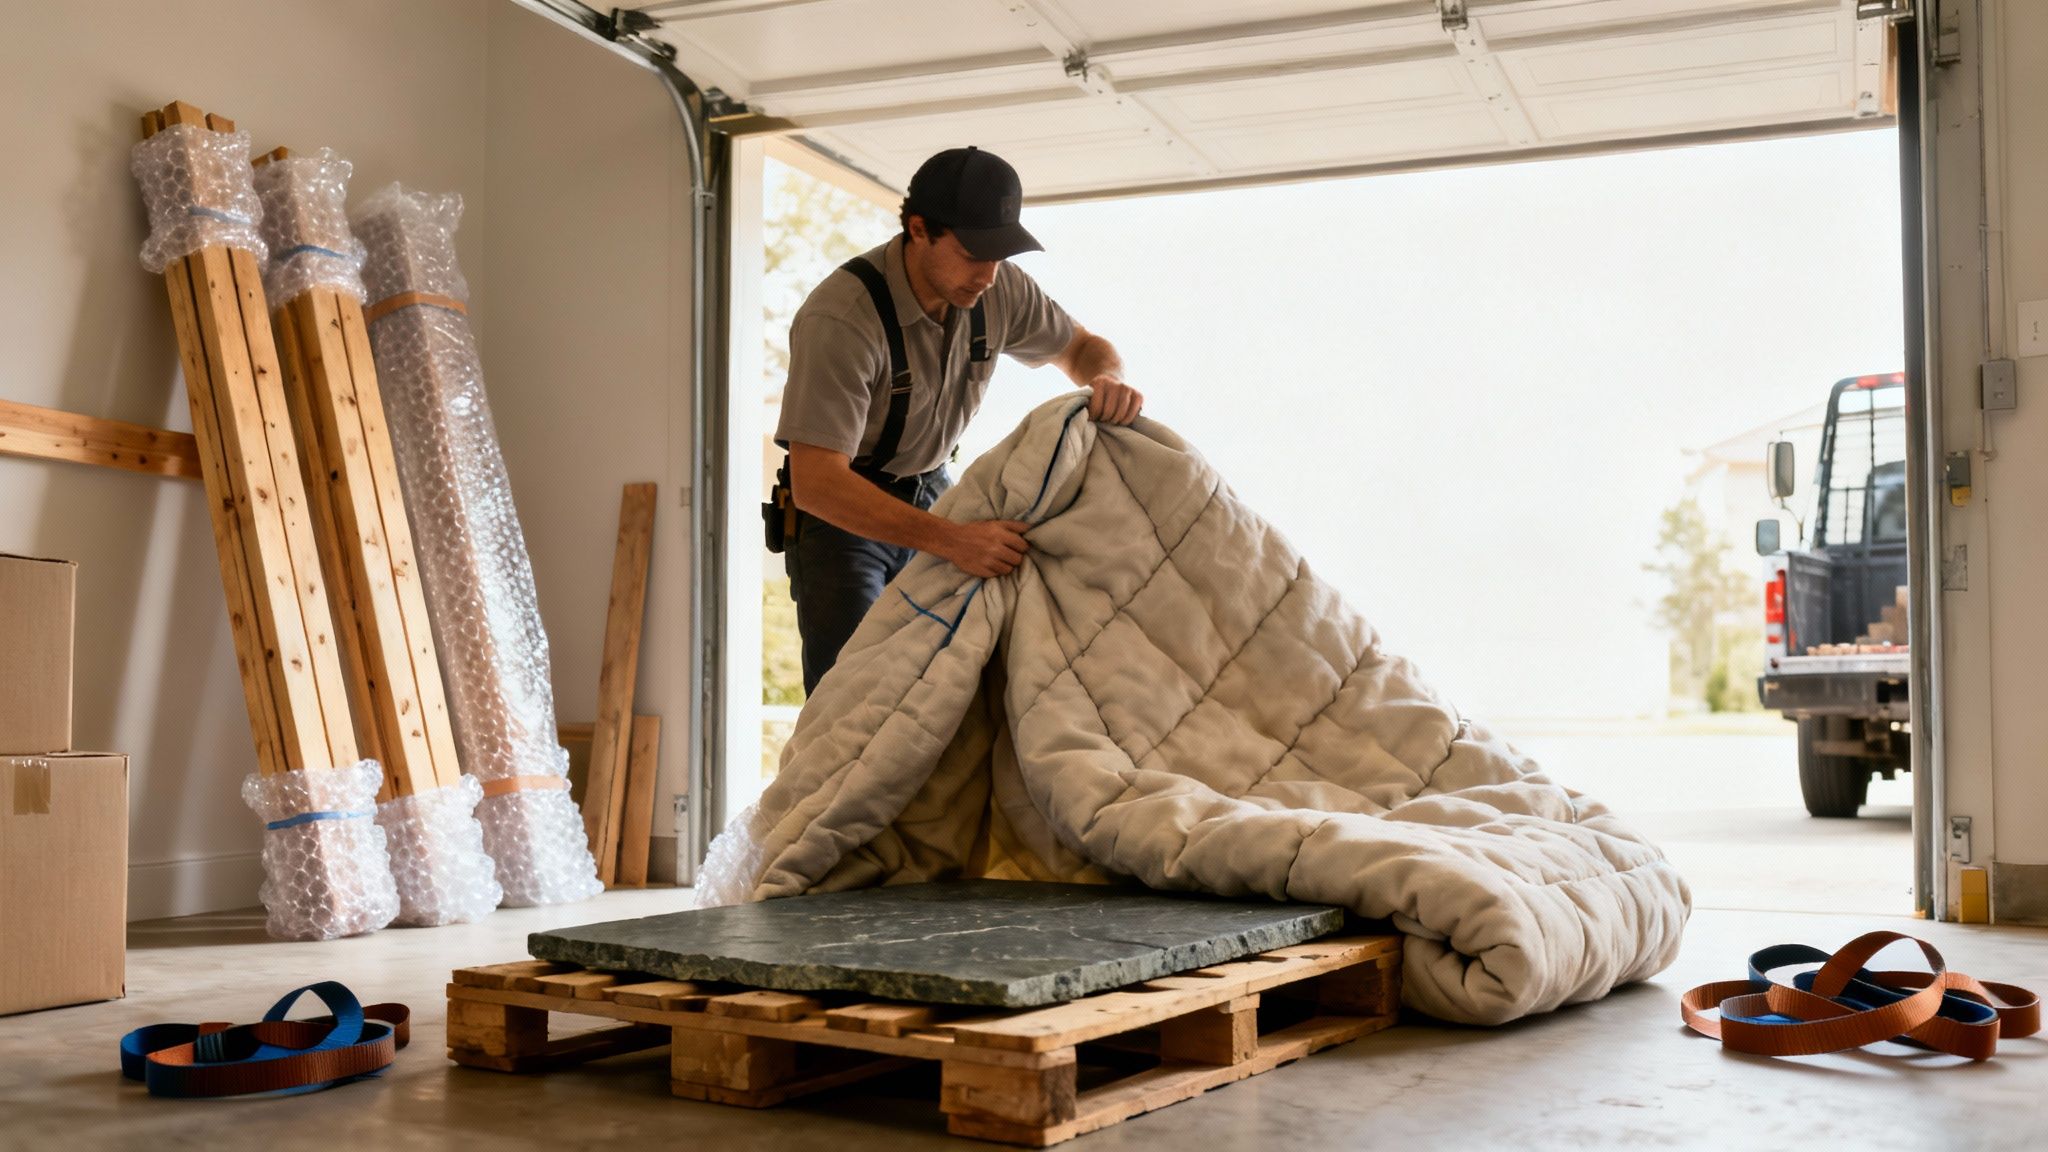
Now that your pool table is in pieces, you’re faced with a pile of heavy, awkward, and surprisingly fragile components. This next stage is all about protection, and it’s where a successful move is separated from a costly disaster of scratches, dents, and chips.
Don’t just think of it as one table; treat each part like its own mini-move. The solid timber rails, the ornate legs, and even the pocket liners all need individual attention. Simply heaving them into the back of a truck is a surefire way to cause damage.
Wrapping the Essentials: Wood and Slate
Let’s focus on the most vulnerable parts first. The wooden rails and legs can easily get scratched or dinged, and those kinds of repairs are never cheap or easy. This is where bubble wrap becomes your most valuable tool.
-
Rails and Legs: Give each wooden piece a generous wrapping in at least two layers of bubble wrap. Pay special attention to the corners, as they’re always the first to get knocked. Secure the wrap with packing tape, but be careful not to let the tape stick directly to the polished wood finish.
-
Slate Pieces: The slate is, without a doubt, your number one priority. Each slab needs to be wrapped in a thick, high-quality moving blanket. These aren’t just for stopping scratches; they provide critical cushioning against the vibrations and bumps of the road.
Never, ever even think about moving slate unwrapped. Its sheer weight means even a minor bump against another object can cause a chip or crack. The price of a good moving blanket is a tiny fraction of what it costs to replace a broken slab of slate. To see how the professionals do it, take a look at our detailed guide on https://emmanueltransport.net.au/furniture-protection-for-moving/.
A common but critical mistake is trying to move a pool table without taking it completely apart. The frame simply isn’t designed to withstand the twisting forces of being tilted or carried whole. The slate, under that uneven load, will almost certainly crack. It’s a shortcut that almost always leads to irreversible damage.
Loading the Truck Strategically
How you load the truck is every bit as important as how you wrap the parts. Think of it as a game of Tetris, but one where weight distribution and stability are the keys to winning. The aim is to build a solid, secure base that won’t shift an inch, whether you’re moving across Perth or just down the road.
Start with the heaviest and flattest items: the slate pieces. Lay them flat on the floor of the truck, right up against a secure wall. You want to make sure they have absolutely no room to slide. Use ratchet straps to lock them down firmly to the truck’s anchor points.
Next, load the table frame and legs, positioning them to keep the load balanced. The wrapped wooden rails and other smaller bits and pieces can then be used to fill in the gaps. Your goal is to make sure every single item is snug and secured. Anything left loose will become a dangerous projectile the moment the truck pulls away from the kerb.
While you’re hauling these heavy parts, don’t forget about the risk to your property. Protecting your home’s surfaces, particularly the floors, is crucial. For some great tips on this, the guide on How to Protect Your Floors From Your Furniture has some really practical advice.
Bringing It All Back Together: Reassembly and Levelling
Getting all the pieces to the new location is a huge relief, but don’t crack open a celebratory drink just yet. The reassembly phase is where the real magic happens, and your patience will be tested. This is the part that separates a professional-feeling table from a lumpy, frustrating one. Rushing now will undo all your hard work.
First things first: get the main frame positioned exactly where you want it. I can’t stress this enough. Once that heavy slate is back on, nudging the table “just a little to the left” becomes a monumental task. Once you’re happy with the frame’s final resting spot, it’s time to tackle the most crucial part of the job: laying the slate.
Getting the Slate Just Right
Gently set each piece of slate back onto the frame, following the labels you made during disassembly. They should sit neatly next to each other, but you’ll notice small gaps at the seams. It might be tempting to ignore them, but these tiny gaps will throw off every single shot.
To get that perfectly smooth, single-piece feel, you need to fill those seams.
- The Filler: The pros use either melted beeswax or a special slate putty. You’ll want to apply it generously, overfilling the gaps just a little.
- The Finish: After the filler hardens, take a sharp scraper or a fresh razor blade and carefully shave down the excess. The goal is to make the seam completely flush and undetectable to the touch.
This is a delicate process that demands a steady hand. When you’re done, a ball should roll over the old seam without the slightest wobble or change in direction.
Honestly, the levelling is what makes or breaks the entire move. A perfectly flat, true surface is the whole reason you own a decent pool table in the first place.
Stretching the Felt and The Final Touch
With the slate now a seamless, solid surface, you can get ready to re-stretch the felt. Lay the cloth over the slate and start stapling it down. I always start in the middle of a long side and work my way out, pulling the felt consistently tight as I go. Any wrinkles or loose spots will slow the balls down and make for a frustrating game.
Finally, you can bolt the rails back on and move to the most painstaking step of all: levelling. For a full-sized table, you’re aiming for a surface that’s level to within a 0.5mm tolerance. Your trusty carpenter’s level from the shed won’t cut it here; you need a proper machinist’s level.
Place the level all over the table—centre, sides, corners—and watch that bubble. You’ll be making tiny, frustratingly small adjustments with shims under the slate or by twisting the leg levellers. It’s a slow dance of tweak, check, and re-check until the bubble sits perfectly in the middle, no matter where you place the level.
It’s no surprise that a staggering 72% of DIY pool table moves result in damage, with repairs often costing over $1,500. You can explore more essential tips for relocating a pool table to see why getting this part right is so important. This final, careful process is what turns a pile of parts back into a table ready for the perfect break.
Common Questions About Moving a Pool Table in Perth
Even after reading a guide, it’s natural to have a few questions buzzing in your head, especially about the specifics of moving a pool table right here in Perth. It’s a huge undertaking, and being armed with all the right information before you start is just plain smart. Let’s dig into some of the most common things people ask us.
Getting clear answers to these questions takes the mystery out of the whole process. It helps you make a confident decision, whether you’re thinking about a DIY job or hiring professionals.
How Much Will It Cost to Move My Pool Table?
Here in Perth, you can generally expect the cost to move a pool table to fall somewhere between $300 and $800. Where your job lands in that range really depends on a few key factors.
A straightforward move from one ground-floor room to another in the same suburb will always be on the cheaper end. But if we’re talking about navigating a tight flight of stairs, squeezing through apartment hallways, or travelling a long distance across town, the price will naturally creep towards that $800 mark. Any good mover will give you a detailed quote upfront so there are no nasty surprises.
Can I Just Move It Without Taking It Apart?
Let me be direct: absolutely not. You should never try to move a pool table without disassembling it completely. The frame just isn’t designed to withstand the torque and stress that comes from being tilted, lifted, and bumped while it’s still in one piece.
The quickest way to crack that incredibly heavy, brittle slate or permanently warp the frame is to try and muscle it out the door whole. Proper disassembly isn’t just a friendly tip—it’s the only way to protect your investment from damage that’s both expensive and often impossible to fix.
How Long Does a Professional Move Usually Take?
From start to finish, a standard professional pool table move—including disassembly, transport, and reassembly—will typically take between three and five hours.
This is just a ballpark figure, of course. A few things can stretch that timeline out. The size of your table, how easy it is to get to at both ends (especially if stairs are involved), and the travel time between properties all play a part. Still, experienced movers are incredibly efficient and will get it done with minimal fuss. If this is part of a larger house move, getting a handle on the Perth removalists’ hourly rates can help you budget for the entire day.
What Happens if the Felt Gets Damaged?
This is a worry we hear all the time, but professional movers are incredibly careful with the felt. They meticulously remove every staple and roll the cloth up properly to avoid any creases or tears.
On the other hand, moving is the perfect excuse to replace old, tired felt. Many moving teams, ours included, can install brand-new felt in whatever colour you like for an extra fee. It’s a great way to give your table a facelift in its new home. And in the rare event of accidental damage caused by a mover’s mistake, any fully insured, reputable company will cover the repair or replacement costs without question.
Planning a move and want to leave the heavy lifting to the experts? Emmanuel Transport specialises in making complex relocations, like moving a pool table, completely stress-free. Visit us at https://emmanueltransport.net.au/ to get your free, transparent quote today.