
Move a Washing Machine Without Damage or Injury
Before you even touch a single hose or cord, the real work of moving a washing machine begins. It all starts with getting your gear in order. Trust me, having the right tools on hand is the single most important thing you can do to protect your machine, your back, and your home from damage.
Gathering Your Essential Moving Day Toolkit
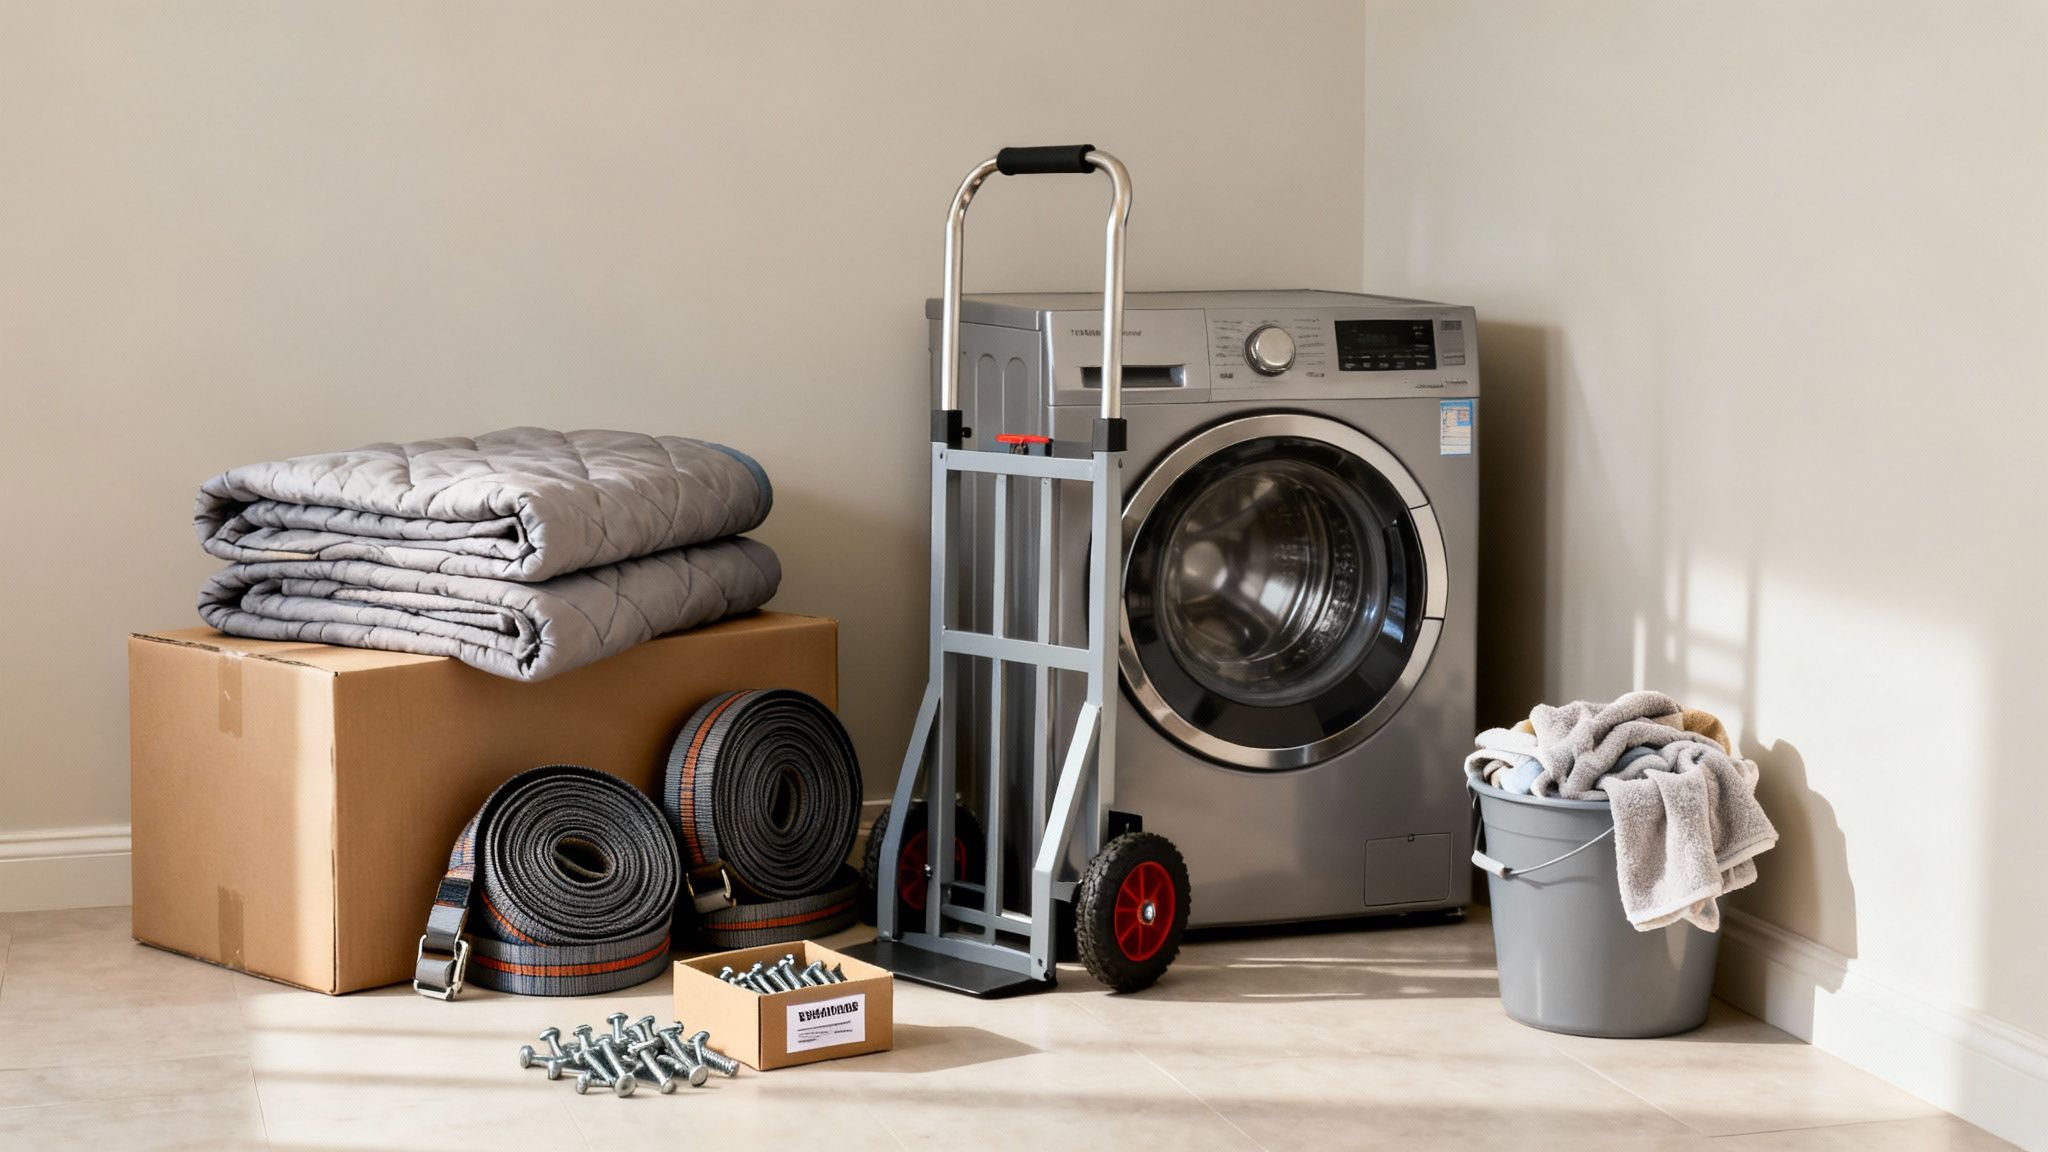
Trying to wrestle with a washing machine without the right equipment is a classic rookie mistake. It’s a surefire way to end up with scratched floors, a dented appliance, or worse, a serious injury.
Here in Australia, these machines are no joke. The average washer weighs between 60-85kg. The front-loaders that are so common these days are particularly hefty, often tipping the scales at 70-85kg, thanks to their internal concrete counterweights. Trying to lift that dead weight is not just difficult; it’s dangerous.
This isn’t just about grabbing a few tools; it’s about a smart, strategic approach. You can get a better sense of tackling these kinds of challenges in our guide on how to move heavy furniture.
Your Must-Have Washing Machine Moving Checklist
Having a checklist takes the guesswork out of it. Here’s a quick rundown of the equipment that separates a smooth move from a stressful one.
| Item | Why You Need It | Insider Tip |
|---|---|---|
| Appliance Dolly | This is your best friend. It lets you safely move the machine’s full weight without breaking your back. The straps are key for stability. | Rent one if you don’t own one. Make sure it has sturdy wheels and a high back to properly support the machine’s height. |
| Transit Bolts | Absolutely critical for front-loaders. These secure the drum, protecting the fragile suspension system from being wrecked during transport. | Lost yours? Don’t skip this step. Order a new set from the manufacturer or a spare parts shop well before moving day. It’s a small cost to avoid a big repair. |
| Moving Blankets | Thick, padded blankets are your shield against scratches and dings on the machine, and they also protect your walls and door frames. | Double-wrap corners and control panels, as these are the most vulnerable spots. Secure the blankets with packing tape so they don’t slip off. |
| Ratchet Straps | High-quality straps are a must for locking the washer onto the dolly and, later, securing it in the back of the truck so it doesn’t slide. | Don’t rely on cheap bungee cords. A proper ratchet mechanism allows you to tighten the straps securely for a truly solid hold. |
Taking the time to get these items together will pay off massively when it’s time to do the heavy lifting.
I’ve seen it countless times: someone tries to ‘walk’ a machine to save a few minutes and ends up with a massive gouge in their timber flooring. An appliance dolly costs less to rent than a floor repair.
The Often-Forgotten Essentials
Beyond the big-ticket items, a few small things can make a huge difference.
Grab a shallow bucket or an old baking tray and have a couple of towels ready before you disconnect the hoses. No matter how much you think you’ve drained it, there will always be some water left inside. This simple prep will stop you from creating a slippery mess on the laundry floor.
One last pro-tip: clean your machine before you move it. Run a cleaning cycle a day or two in advance, then wipe it down and leave the door open for at least 24 hours to air it out completely. This prevents that awful musty, mouldy smell from developing while it’s sealed up and being transported. You’ll thank yourself when you open it up in your new home.
Disconnecting Hoses and Draining Water Safely
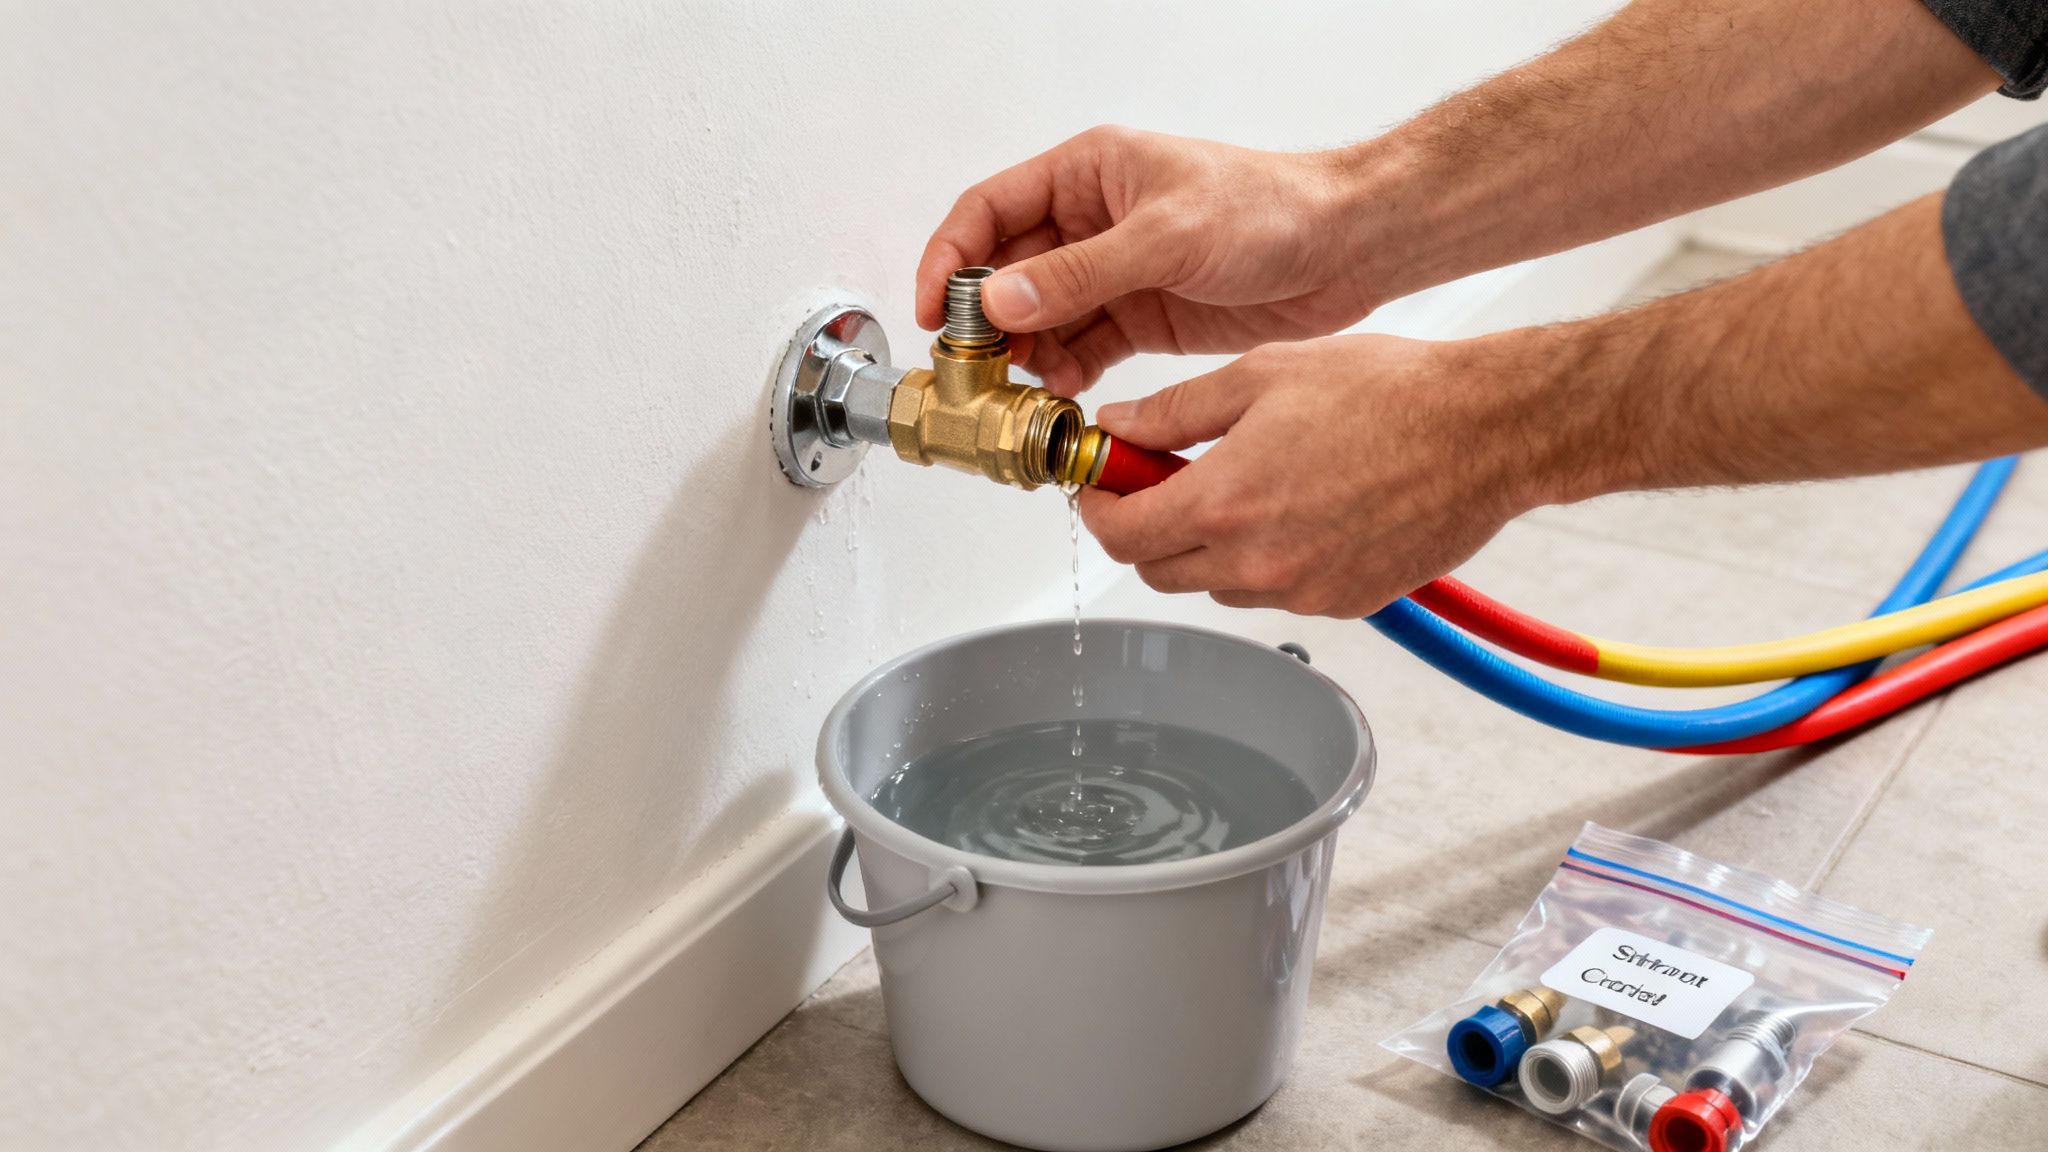
Alright, with your tools laid out, it’s time to tackle the plumbing. This is where a little bit of care and a methodical approach will save you from a major headache. Trust me, rushing this part is the fastest way to turn your laundry room into a makeshift swimming pool, and nobody wants that.
First thing’s first, and this is non-negotiable: turn off the water supply. Find the hot and cold taps behind your washing machine – they’ll almost always have red and blue indicators. Give them a firm twist clockwise until they won’t turn any further. This single action stops pressurised water from making a surprise appearance the moment you loosen a fitting.
Managing the Water Hoses
Now you can grab your bucket and towels. Position them right under where the hoses connect to the back of the machine. Even with the mains off, there’s still a surprising amount of water trapped in the lines.
Take your shifting spanner or pliers and slowly start turning the hose fittings anti-clockwise. Be ready with a towel to catch the inevitable first few drips.
Once they’re completely loose, let both hoses drain out into the bucket. You’ll be glad you did.
Pro Tip: I always keep a couple of zip-lock bags in my toolkit for this. Pop the hot and cold hoses into separate bags and label them. It’s a simple trick, but it completely eliminates any confusion when you’re setting everything back up at the other end.
Dealing With the Drain Hose
Next up is the drain hose—that wider, usually grey, flexible pipe that carries away all the dirty water. It’s typically hooked over a standpipe or plumbed into a spigot under the laundry sink.
Before you just yank it out, it helps to know what kind of setup you have. Waste plumbing can vary quite a bit from house to house. If you’re curious about the specifics or have a less common connection, checking out a plumber’s guide to 32mm waste pipe can give you some handy background info.
Carefully lift the drain hose out of its position. Brace yourself, because this is where the messiest water comes from. Lower the end directly into your bucket and let it drain completely.
With all the hoses disconnected and empty, your final step here is to secure them. Use some tape or cable ties to neatly fasten them to the back of the machine. This keeps them from flapping around, catching on door frames, or becoming a trip hazard during the actual move. A tidy machine is a much safer machine to lift.
Mastering the Art of Lifting and Manoeuvring
Alright, with the machine all disconnected, we’re at the pointy end of the job. This is where moving a washing machine becomes less about plumbing and more about pure physics. Let’s be honest, an appliance that can weigh over 70kg isn’t something you can just muscle around without a game plan.
I’ve seen it time and again—people trying to be heroes and ending up with a strained back. It’s the most common moving day injury. The golden rule is simple but absolutely crucial: lift with your legs, not your back. Get low by bending your knees, keep your spine as straight as possible, and get a solid grip. When you need to turn, move your feet. Don’t ever twist at the waist while holding that much weight.
Using an Appliance Dolly Like a Pro
An appliance dolly isn’t just a nice-to-have; it’s a non-negotiable piece of kit for this job. It’s the difference between a controlled, safe move and a risky two-person wrestling match with a very heavy, very unforgiving opponent.
Getting the washer onto the dolly correctly is half the battle. Here’s how we do it:
- Slide, Don’t Lift: Get your helper to steady the washing machine as you carefully tilt it back just enough to slide the dolly’s platform right underneath.
- Centre the Load: Make sure the machine is sitting dead centre on the dolly. If it’s off-balance, it’ll want to tip the second you hit a corner or a slight bump.
- Strap It Down Tight: This is the step people always rush, and it’s a huge mistake. Wrap the dolly straps around the middle of the washer and crank that ratchet until it’s absolutely solid. The machine and dolly should move as one single unit.
I can’t count the number of times I’ve seen a washing machine slide off an unstrapped dolly at the first crack in the pavement. It always ends in dents, scratches, or worse. Those extra 30 seconds to secure the straps are well worth it.
Navigating Tricky Spaces and Stairs
Doorways, narrow hallways, and the dreaded staircase—these are the obstacle courses of moving. This is where teamwork and crystal-clear communication become your most valuable tools. Before you move an inch, walk the entire route from the laundry room to the truck. Seriously. Look for tight turns, low-hanging lights, and any uneven spots on the floor that could catch a wheel.
For those skinny hallways, I find it’s often easier to pull the dolly backwards. One person pulls and steers while the other walks in front, acting as a spotter to keep the machine from scraping against the walls. When the job involves really tight spaces or stacked units, it’s often smartest to call in the experts. You can find professional help for moving heavy laundry appliances who have specialised gear like air sleds to make it look easy.
Taking on stairs is a two-person job, minimum. No exceptions.
- The Bottom Person: This person is the guide, controlling the descent or ascent and bearing the brunt of the weight. They take it one step at a time.
- The Top Person: This person is the brake and the stabiliser. Their job is to prevent the dolly from getting away from you.
Talk to each other constantly. Simple, clear calls like “Ready?”, “Going down,” and “Hold” are essential. This coordination is what prevents a runaway appliance, which is not only dangerous but almost guaranteed to destroy whatever is in its path. For more general advice on shifting big items, you might find our other furniture moving tips useful. Remember, slow and steady is the only way to win this race. Rushing is your worst enemy.
Locking Down Your Washing Machine for the Ride
Getting the washer onto the truck feels like a win, but don’t relax just yet. The journey is where a lot of things can go wrong. A heavy appliance loose in the back of a truck is a recipe for disaster. One sharp turn or a sudden stop can send it sliding, leading to dents, scratches, or even serious damage to the sensitive drum and suspension.
Think about it—the inside of a moving truck is a pretty rough environment. Everything is vibrating and shifting. This is why professional removalists are so meticulous about strapping down heavy items. They make sure nothing moves an inch. Your job is to do the same to ensure your washing machine gets to its new home in one piece.
Finding the Right Spot and Strapping It Down
The best place for your washing machine is right up against the front wall of the truck, what movers call the “headboard.” Putting it there stops it from gaining any real momentum if things get bumpy. Try to centre it, then grab your ratchet straps to lock it in place.
You’ll want to use at least two good-quality ratchet straps. Loop them through the anchor points or rails on the truck wall and wrap them firmly around the middle of the machine.
- Get it tight: Crank those straps until there’s zero slack left. Give the washer a good shove—it shouldn’t rock or slide at all.
- Use an ‘X’ pattern: For extra stability, crisscross the straps over the front of the machine. This is a great trick to stop it from shifting side-to-side.
It’s easy to underestimate these machines, but in Australia, the average washer weighs between 60-85kg. Injuries and damage are more common than you’d think. Transport dents are a huge issue because the drums are surprisingly delicate. Pros often pack them between softer items to stop them from shifting around. You can learn more about the professional approach to moving washing machines to see just how important these steps are.
This simple workflow sums up the key actions for handling your machine safely, even before it hits the truck.
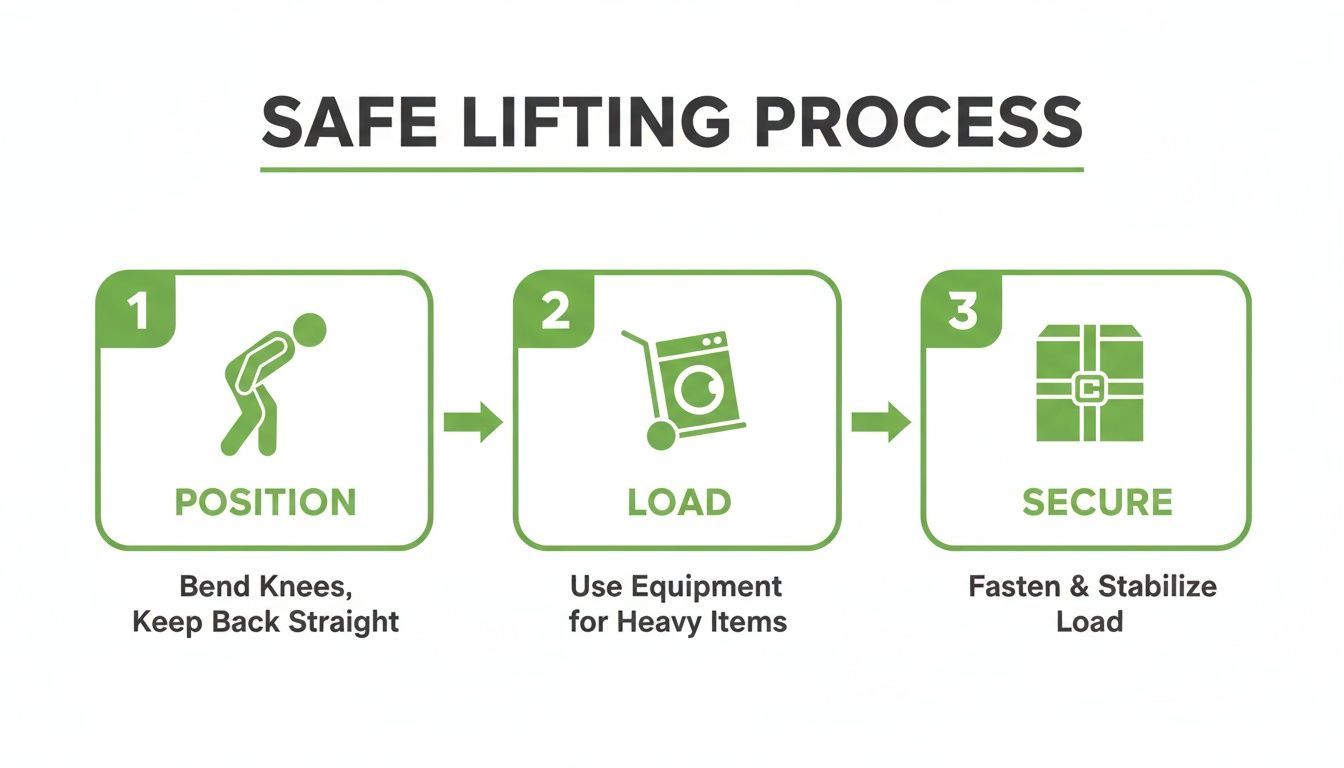
As the graphic shows, securing the load is the final, critical piece of the puzzle, not an afterthought.
Build a Buffer Zone
Even when strapped in tight, road vibrations can still cause scuffs and scratches. This is where moving blankets and a bit of smart packing come in handy.
I always tell people to use their soft furnishings to their advantage. A mattress, sofa cushions, or even bags of bedding packed tightly around the washer act as a fantastic shock absorber. It stops the machine from vibrating against the truck walls or other hard items.
First, drape a thick moving blanket over the entire machine before you strap it down. Then, look around for other bulky, soft items and wedge them into any gaps. This creates a protective cocoon that absorbs the bumps and rattles of the road, ensuring your appliance arrives looking and working as it should.
Getting Set Up in Your New Home
You’ve done the heavy lifting, but the job isn’t quite finished. Now comes the final, crucial step: getting your washing machine reinstalled and running properly. Don’t be tempted to rush this part. A hasty setup can lead to frustrating leaks, weird rattling noises, or a machine that violently shudders its way across your new laundry floor.
Taking a few extra minutes here is the difference between a successful move and a future headache. The goal is a quiet, stable, and perfectly functioning machine from the very first wash.
Nailing the Position and Levelling
First things first, get the machine into its new home. Once you’ve wrestled it into position, you absolutely must remove the transit bolts. This is the most important step of the entire process. If you forget, the machine will shake uncontrollably during the spin cycle and you risk permanently wrecking the drum’s suspension.
With the bolts safely out, it’s time to get it perfectly level. An unbalanced washer is the number one reason they “walk” across the floor.
- Pop a spirit level on top of the machine.
- Check the level from side to side, then from front to back.
- Nearly all washing machines have adjustable feet. Simply twist them up or down until the bubble in your spirit level is dead centre.
It’s amazing how much difference a slightly uneven floor can make. I once spent the better part of an hour trying to diagnose a noisy new machine, only to realise one of the back feet just needed one more turn to get it perfectly stable.
Hooking Up the Hoses
Now that your machine is stable, you can hook it back up to the water supply. If you took our advice and labelled the hoses when you disconnected them, this part should be a breeze.
Attach the hot (red) and cold (blue) inlet hoses to their matching wall taps. Screw them on by hand at first—this prevents you from cross-threading the plastic connectors. Once they’re snug, give them a final quarter-turn with your pliers to seal the deal. Be careful not to overtighten, as you can easily crack the plastic fittings and cause a slow leak.
Next, securely place the drain hose into the laundry standpipe or sink spigot. Make sure it’s pushed in far enough that the water pressure won’t force it out, but not so far down that it creates a siphoning effect. The hose should sit comfortably without any sharp bends or kinks. If this is all part of a larger move, you might find a guide on getting your house utilities connected helpful to make sure nothing gets missed.
The All-Important Test Run
Okay, we’re on the home stretch. Before you start on that mountain of laundry, you need to run a quick test cycle. A short, empty “rinse and spin” program is all you need for this final check.
Stick around and watch the entire cycle from start to finish. Keep an eye out for any drips from the hose connections at the back. Listen for any unusual banging or thumping sounds. A properly installed machine should stay put during the final, high-speed spin.
If you notice any leaks or excessive wobbling, stop the cycle immediately. Go back and double-check that your hose connections are tight and that the machine is still perfectly level.
Once it runs through a full cycle without any drama, you’re officially done. Congratulations, your washing machine is properly installed, ready to use, and you can confidently get back to tackling that growing laundry pile with complete peace of mind.
Got Questions About Moving Your Washing Machine?
Even the most organised move can hit a snag when it comes to shifting a big, bulky appliance like a washing machine. It’s completely normal to have a few questions. After all, nobody wants to risk damaging their machine or their home. Let’s tackle some of the most common queries we hear from people doing this for the first time.
Are Transit Bolts Really That Important?
Yes, one hundred percent. For front-loading machines, in particular, they are absolutely non-negotiable. Transit bolts are specifically designed to lock the drum in place, protecting the delicate internal suspension system from the jolts and bumps that are inevitable during a move.
Skipping this step is probably the single biggest mistake you can make. It’s an easy way to snap the suspension or knock the drum out of alignment, which can cause major internal damage and lead to a hefty repair bill. If you can’t find the original bolts that came with your machine, it’s worth every cent to order a new set from the manufacturer before you even think about moving it.
Think of it this way: moving a washer without transit bolts is like driving a car with no shock absorbers. Every bump in the road sends a shockwave straight to the most fragile components. It’s only a matter of time before something gives way.
Can I Lay My Washing Machine Down to Transport It?
This comes up a lot, and the answer is always a hard no. Every single manufacturer will tell you not to transport a washing machine on its side or back, and for very good reason. Laying it down allows the heavy inner drum to sag against its mounts, which can easily damage or break them.
Worse still, any water left inside can leak out of the hoses or pump and seep directly into the sensitive electronics and control board. The only safe way to move your washer is to keep it upright the entire time, secured tightly to an appliance dolly and then strapped in place inside the moving truck.
What Are the Biggest DIY Moving Blunders?
Aside from the two big ones we just covered, a few other common mistakes tend to trip people up.
- Trying to be a hero: These machines are much heavier and more awkward than they look. Always, always have at least one other person to help you lift and guide it.
- Forgetting to drain it properly: This is a recipe for a messy, slippery disaster. Water will spill in your old house, the truck, and all over the floor of your new place. Take those extra few minutes to drain every last drop.
- Dragging it across the floor: Please don’t do this. Sliding your washer is the fastest way to leave deep, ugly scratches on your beautiful timber, vinyl, or tile floors.
How Can I Tell if the Machine Is Level?
Once you’ve got the washing machine into its new spot, grab a spirit level. Pop it on top of the machine and check it from front-to-back and then side-to-side.
Nearly all washers have adjustable feet you can twist to raise or lower each corner. Just keep tweaking them until the bubble on the level sits perfectly in the middle. Getting it perfectly level is the key to stopping it from vibrating violently or “walking” across the floor during a spin cycle, which significantly shortens its lifespan.
Feeling a bit overwhelmed by the thought of bolts, dollies, and all that heavy lifting? The experienced team at Emmanuel Transport can take care of your entire move, including tricky appliances, with professional precision. Get your free, transparent quote today and make your move stress-free.